
Learn How to Cook Basic Grilled Meats With These Outdoor Grilling Tips
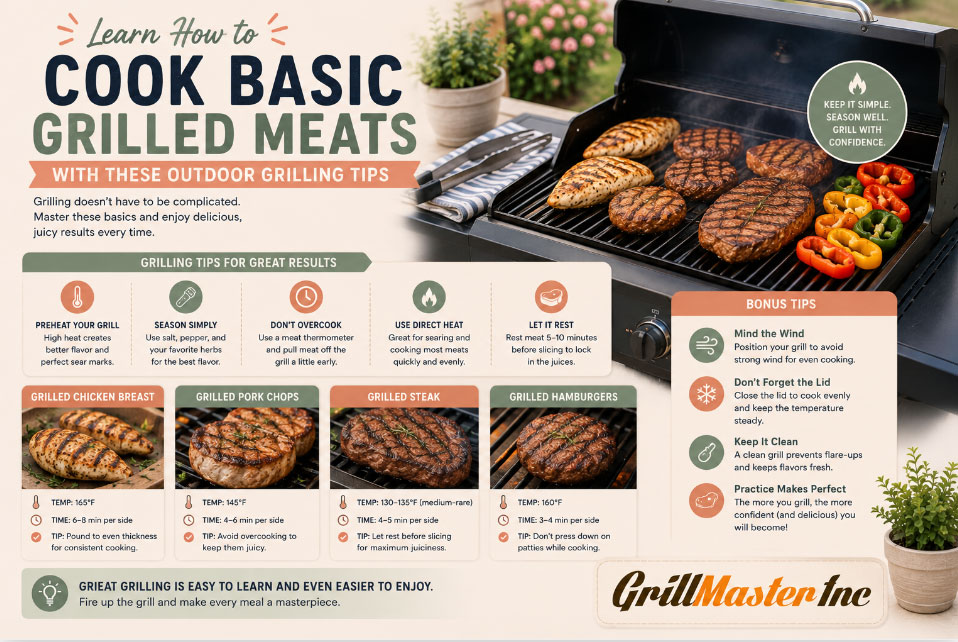
There's a particular sound that marks the start of grilling season — that first hiss when meat meets a hot grate. It's a small moment, but it carries a lot of promise: an afternoon outside, the smell of char and smoke drifting over the fence, and a plate of food that tastes better simply because of how it was cooked. Grilling is one of the oldest cooking methods humans have, yet it still trips up plenty of home cooks who end up with dry chicken, scorched burgers, or steaks that are gray all the way through.
The good news is that grilling basic meats — chicken, beef, and pork — doesn't require culinary school training. It requires a handful of principles applied consistently: the right heat, the right timing, the right tools, and a little patience. This guide walks through everything a beginner or a rusty weekend griller needs to turn out consistently good results, along with resources worth bookmarking for reference.
Why Grilling Still Belongs at the Center of Outdoor Cooking
Grilling has survived every food trend of the last few decades because it does something few other cooking methods do well: it builds flavor through direct, high heat contact while keeping the process simple. There's no roux to whisk, no oven to preheat for forty-five minutes, no sauce that needs babysitting. A grill just needs fuel, heat, and attention.
There's also a practical case for grilling. It moves cooking outside, which means less cleanup indoors, less heat added to the kitchen in summer, and a built-in reason to gather people around. Basic grilled meats — a simple grilled chicken breast, a well-seared steak, a rack of pork chops — are also some of the most versatile foods a cook can master. Once the fundamentals click, they translate to fajitas, kabobs, sandwiches, salads, and meal-prep proteins for the entire week.
Choosing the Right Grill for Basic Meats
Before getting into technique, it helps to understand the tool doing the work. Not all grills behave the same way, and the type of grill someone owns changes how they should approach heat and timing.
Charcoal grills produce the deepest smoky flavor and the highest sustained heat, which makes them excellent for searing steaks and burgers. The tradeoff is a steeper learning curve — lighting charcoal, managing airflow through vents, and building distinct heat zones takes practice.
Gas grills offer convenience and precise, repeatable heat control. Turning a dial is far easier than managing coals, which makes gas a strong choice for anyone learning the basics of doneness and timing without also learning fire management at the same time.
Pellet grills run on wood pellets and a thermostat-controlled auger, blending some charcoal-like flavor with gas-like consistency. They're particularly forgiving for low-and-slow cooking, though they run slightly cooler for high-heat searing compared to charcoal or gas.
None of these is objectively "better" for a beginner — the right choice depends on how much hands-on fire management someone wants to do. What matters more than the grill itself is understanding heat zones, which applies no matter which type sits in the backyard.
Essential Tools Every Backyard Griller Needs
A few inexpensive tools separate consistent grilling from guesswork:
- An instant-read meat thermometer. This is the single most important tool on this list. Color and texture are unreliable indicators of doneness; internal temperature is not.
- Long-handled tongs. Forks pierce meat and let juices escape. Tongs grip without puncturing.
- A stiff grill brush or scraper. A clean grate prevents sticking and keeps old, burnt residue off new food.
- A chimney starter (for charcoal grills). It lights coals evenly without lighter fluid, which can leave an off-flavor on food.
- A spray bottle of water. Handy for taming flare-ups without drowning the fire entirely.
- Heat-resistant gloves. Useful for adjusting hot grates, moving coals, or handling a full rack of ribs.
None of this needs to be expensive. A basic thermometer and a decent pair of tongs will do more for grilling results than any marinade recipe.
Understanding Heat Zones: The Secret Most Beginners Skip
If there's one concept that separates confident grillers from frustrated ones, it's heat zoning. Most beginners spread coals evenly or set every gas burner to the same temperature, then wonder why thick cuts burn on the outside while staying raw inside.
The fix is to create at least two zones:
Direct heat zone — the area directly over coals or a lit burner. This is where searing happens: quick, high-heat contact that builds a browned crust through the Maillard reaction.
Indirect heat zone — an area with no coals underneath, or with burners turned off. This acts like a mild oven, letting thicker cuts finish cooking through without burning the exterior.
A simple two-zone setup works like this: sear meat directly over the hot zone for color and crust, then slide it to the indirect zone to finish cooking to the correct internal temperature. This single technique fixes the majority of "burnt outside, raw inside" complaints beginners run into with chicken thighs, thick pork chops, and bone-in cuts.
Grilling Chicken: Getting Juicy Results Every Time
Chicken is often the meat that trips people up the most, mainly because it has zero margin for undercooking and very little margin for overcooking before it turns rubbery.
Bone-In vs. Boneless
Bone-in, skin-on pieces are more forgiving because the bone insulates the meat and slows cooking slightly, while the skin protects against moisture loss. Boneless, skinless breasts cook fast and dry out quickly if left unattended, so they benefit from brining or marinating beforehand and from being pulled off the grill the moment they hit temperature.
Technique
- Pat chicken dry and season generously — salt at least 30 minutes ahead of time if possible, which helps the meat retain moisture during cooking.
- Start skin-side down over direct heat to render fat and crisp the skin.
- Move to indirect heat to finish cooking through without burning the exterior.
- Check internal temperature in the thickest part, avoiding the bone.
Safe Temperature
According to the U.S. Department of Agriculture, all poultry — including ground chicken — should reach an internal temperature of 165°F. Unlike beef, there's no "medium" option here; chicken is either safely cooked or it isn't.
Grilling Beef: Steaks, Burgers, and Doneness Temperatures
Beef is where grilling technique gets a bit more nuanced, mostly because doneness is a matter of personal preference rather than a single safety threshold.
Choosing a Cut
For beginners, thicker cuts are more forgiving than thin ones because they give a wider window between "perfectly seared" and "overcooked." Ribeye, New York strip, and sirloin are reliable choices. Thinner cuts like skirt or flank steak cook fast and are best served closer to medium-rare, since they toughen quickly past that point.
Technique for Steaks
- Bring steak close to room temperature before grilling — a cold center cooks unevenly.
- Season simply. Salt and pepper applied generously do most of the work; the grill provides the rest of the flavor.
- Sear hard over direct heat for a well-browned crust, then move to indirect heat if the cut is thick enough to need it.
- Pull the steak off the grill about 5 degrees before the target temperature, since it continues cooking briefly from residual heat — a process known as carryover cooking.
Doneness Guide
| Doneness | Internal Temperature |
|---|---|
| Rare | 125°F |
| Medium-rare | 135°F |
| Medium | 145°F |
| Medium-well | 150°F |
| Well-done | 160°F |
The USDA's minimum safe temperature for whole cuts of beef is 145°F with a three-minute rest. Ground beef, because grinding introduces surface bacteria throughout the meat, needs to reach 160°F.
Burgers
Burgers deserve their own note because so many people overwork the meat. Handle ground beef as little as possible when forming patties — overworking it creates a dense, tough texture. Press a shallow dimple into the center of each patty before grilling; this keeps it from puffing into a dome as it cooks. Resist the urge to press down on burgers with a spatula while they grill — that just squeezes out the juices that make them worth eating.
Grilling Pork: Chops, Ribs, and Timing Tips
Pork has changed a lot over the last couple of decades. Modern pork is leaner than it used to be, and the old advice to cook it until gray and dry is outdated and, frankly, ruins the meat.
Pork Chops
Bone-in chops, at least an inch thick, hold up best on the grill. Thin chops dry out almost immediately over direct heat. Sear both sides over direct heat, then move to indirect heat if needed to reach temperature gently. A quick brine — even just 20 minutes in a simple saltwater solution — makes a noticeable difference in juiciness.
Ribs
Ribs are the exception to the "high heat, fast cooking" rule most other meats follow. They're a connective-tissue-heavy cut that needs low, slow, indirect heat over a couple of hours to break down properly and become tender. Wrapping ribs in foil partway through cooking — sometimes called the "Texas crutch" — helps retain moisture during the long cook.
Safe Temperature
Whole cuts of pork, including chops and roasts, are safe at 145°F with a three-minute rest, per USDA guidance. Ground pork should reach 160°F. Ribs are typically cooked well past the minimum safety threshold — often into the 195–203°F range — not for safety, but because that's the temperature at which connective tissue breaks down into gelatin, giving ribs their signature tenderness.
Food Safety Basics You Shouldn't Skip
Grilling happens outdoors, often with distractions — conversation, drinks, other dishes being prepared — which makes it easy to get careless about food safety. A few habits matter more than people realize:
- Never place cooked meat back on the same plate that held it raw without washing the plate first. Cross-contamination is one of the most common outdoor cooking mistakes.
- Wash hands and tools between handling raw meat and anything else.
- Don't rely on color or juice clarity to judge doneness. A thermometer is the only reliable method, especially for chicken and ground meats.
- Keep raw meat refrigerated until it's ready to go on the grill, particularly in hot weather when bacteria multiply faster at room temperature.
- Let meat rest after cooking. Resting isn't just about flavor — for larger cuts, it allows the temperature to finish rising slightly and juices to redistribute rather than spill out onto the cutting board.
The USDA's FoodSafety.gov site keeps an updated, detailed breakdown of safe cooking temperatures and food handling practices worth referencing anytime there's doubt.
Common Grilling Mistakes (and How to Fix Them)
Every experienced griller has made these mistakes at some point. Recognizing them early saves a lot of ruined dinners.
Flipping too often. Meat needs uninterrupted contact with the grate to develop a proper sear. Flipping repeatedly out of nervousness prevents that crust from forming. As a rule of thumb, flip once, maybe twice, and let the grill do its job in between.
Grilling straight from the fridge. Cold meat cooks unevenly, with an overcooked exterior by the time the center catches up. Letting meat sit out for 20–30 minutes before grilling — food safety permitting in hot weather — evens out the cooking process.
Not preheating the grill. A grill that hasn't reached full temperature won't sear properly; it'll steam the meat instead, leading to a pale, sticky surface rather than a browned crust.
Ignoring flare-ups. A little flare-up from dripping fat is normal, but a grill left unattended during a big flare-up can scorch food or create bitter, sooty flavors. Moving meat to indirect heat temporarily, or using a light spray of water, tames the flames without ruining the cook.
Skipping the rest. Cutting into meat right off the grill lets all those juices run out onto the cutting board instead of staying in the meat. A five-to-ten-minute rest, loosely tented with foil, makes a real difference.
Guessing instead of checking temperature. This one bears repeating because it's the most common mistake of all. A thermometer costs less than a single ruined steak.
Resting, Slicing, and Serving Like a Pro
Once meat comes off the grill, the work isn't quite finished. Resting allows muscle fibers, which have tightened up under heat, to relax and reabsorb some of their juices. Skipping this step is why a steak that looked perfect on the grill sometimes ends up dry on the plate — all that moisture pooled out during the first cut.
For steaks, a five-minute rest is usually enough. Larger cuts, like a whole grilled chicken or pork roast, benefit from ten to fifteen minutes.
Slicing technique matters too, particularly for beef. Cutting against the grain — perpendicular to the direction of the muscle fibers — shortens those fibers and makes each bite noticeably more tender. This matters most with cuts like flank or skirt steak, where the grain is easy to see and easy to get wrong.
Helpful Resources for Grilling Enthusiasts
A handful of organizations and brands maintain reliable, regularly updated grilling and food safety information worth bookmarking:
- USDA Food Safety and Inspection Service — official minimum safe cooking temperatures and meat handling guidance.
- FoodSafety.gov — a government resource covering food storage, safe temperatures, and outdoor cooking safety.
- Weber — grilling guides, cut-by-cut cooking charts, and grill maintenance advice from one of the most established grill manufacturers.
- ThermoWorks — in-depth guidance on thermometer use and temperature accuracy for meat.
- Certified Angus Beef — beef cut guides, doneness charts, and grilling techniques specific to different cuts.
- Traeger — resources geared toward pellet grilling and low-and-slow cooking, useful for ribs and larger cuts.
These sites are worth checking directly for updated charts, seasonal recipes, and manufacturer-specific grill guidance, since cooking times can vary slightly depending on equipment.
Frequently Asked Questions
How long should meat rest before grilling? About 20 to 30 minutes at room temperature is generally enough to even out the cooking process, though raw meat shouldn't sit out for extended periods in hot weather.
What's the safest way to check if grilled meat is done? Use an instant-read meat thermometer inserted into the thickest part of the meat, avoiding bone. Color and juice clarity aren't reliable indicators on their own.
Why does grilled chicken sometimes turn out dry? Usually because it's boneless, skinless chicken cooked without brining or marinating, or because it was left on the grill past 165°F. Pulling it right at temperature and letting it rest solves most dryness issues.
Do I need a two-zone fire for basic grilling? For thin cuts like burgers or thin chicken breasts, a single hot zone is often fine. For thicker cuts — bone-in chicken, thick pork chops, ribs — a two-zone setup prevents burning the outside before the inside finishes cooking.
Is it safe to eat pork slightly pink in the middle? Yes. Modern USDA guidelines allow whole cuts of pork to be cooked to 145°F with a three-minute rest, which can leave a slightly pink center. This is different from ground pork, which needs to reach 160°F.
What's the biggest mistake beginner grillers make? Flipping meat too often and not using a thermometer. Both come from the same instinct — wanting more control — but both actually reduce it.
Final Thoughts
Grilling basic meats well comes down to a short list of fundamentals: manage heat zones, season with confidence, use a thermometer instead of guesswork, and let the meat rest before cutting into it. None of this requires expensive equipment or years of practice — it requires consistency and a willingness to trust the process instead of poking, flipping, and pressing out of nervous habit.
Once chicken, beef, and pork are handled with confidence, everything else on the grill gets easier — vegetables, seafood, more ambitious cuts, whatever comes next. The backyard grill has earned its place as one of the most reliable tools in home cooking, not because it's complicated, but because it rewards a few simple habits done consistently, cookout after cookout.